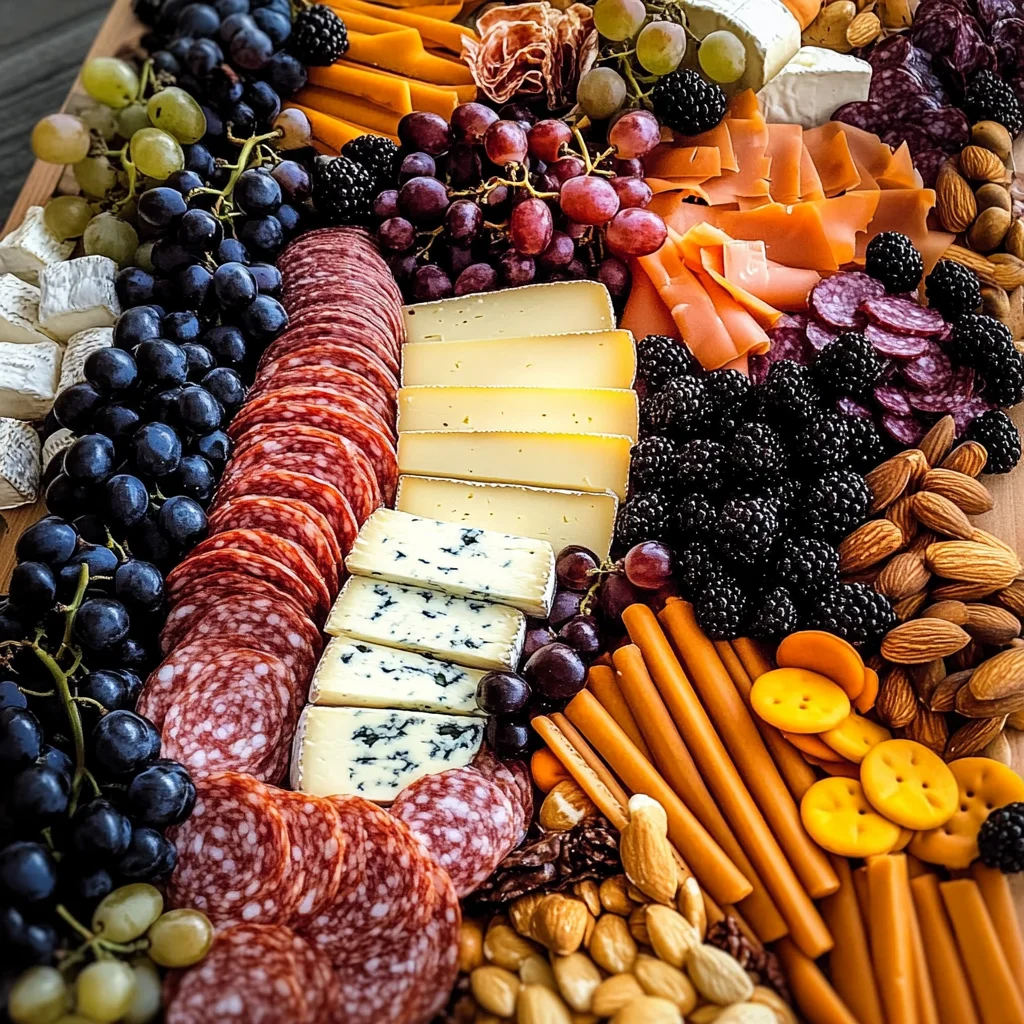
Halloween Charcuterie board
A festive Halloween charcuterie board is the easiest way to entertain. Everyone loves a good cheese board, and this one will be a hit! Perfect for Halloween parties, gatherings, or even a cozy night in, this charcuterie board combines delicious flavors with spooky aesthetics that will impress your guests. With a variety of cheeses, meats, fruits, and treats, it’s an appealing centerpiece that requires minimal effort.
Why You’ll Love This Recipe
- Easy to Assemble: This Halloween charcuterie board requires no cooking, making it quick and stress-free for any host.
- Visually Stunning: The vibrant colors of the ingredients create a beautiful display that adds excitement to your table.
- Versatile Options: Customize the ingredients based on your guests’ preferences or dietary restrictions; everyone can find something they love!
- Perfect for Sharing: This board encourages social interaction as guests can mingle and build their plates together.
- Spooky Vibes: It perfectly captures the spirit of Halloween while still being classy enough for any gathering.

Tools and Preparation
To create your Halloween charcuterie board, you’ll need some essential tools and equipment. These will help you assemble everything efficiently while ensuring an attractive presentation.
Essential Tools and Equipment
- A large serving board or platter
- Small bowls for spreads and olives
- Cheese knives
- Serving tongs or picks
Importance of Each Tool
- Serving Board: A large surface allows you to arrange all your ingredients beautifully without crowding.
- Small Bowls: Having bowls for spreads keeps items organized and prevents messiness on the board.
- Cheese Knives: These make it easy for guests to serve themselves without fussing over cutting cheese.
- Serving Tongs or Picks: Great for hygiene and convenience, allowing guests to grab items without using their hands.
Ingredients
For the Cheeses
- 300 g (10oz) Gorgonzola
- 200 g (7oz) Cheddar (sliced into batons)
- 200 g (7oz) aged Provolone (sliced into thin wedges)
- 100 g (3.5oz) goat’s cheese
For the Meats
- 200 g (7oz) salami
- 200 g (7oz) chorizo
- 150 g (5oz) Prosciutto
For the Accompaniments
- 1 cup almonds
- 2 cups blackberries
- 2 bunches black grapes
- ½ cup tomato jam
- 1 cup cornichons
- 1 cup green olives
- crackers
How to Make Halloween Charcuterie Board
Step 1: Prepare Your Board
Grab your biggest serving board or platter then add bowls for things like olives, preserves or spreads and cornichons or nuts.
Step 2: Arrange the Bowls
Place the bowls on the board, spaced apart. I like to place the cheese down first. I sliced the firmer cheeses into thin wedges and batons.
Step 3: Add Cheese
This makes it easier for each guest to serve themselves. Firm cheese can also be cubed. Keep soft cheese and blue cheese whole; just remember to add a little cheese knife to each cheese so it’s easy for guests to slice a piece off for themselves.
Step 4: Incorporate Meats
Add the meat. Fold or roll thinly sliced meats and place them in between the cheese.
Step 5: Include Bread & Crackers
Slice bread and place it on the board along with crackers. I like to stack the crackers on their sides so it’s easy to grab.
Step 6: Fill in with Fruit & Extras
Fill in any spaces with fruit, nuts, pickles, and olives. Fill the bowls with some of these items as well as spreads.
How to Serve Halloween Charcuterie board
Serving a Halloween charcuterie board is all about presentation and enjoyment. Here are some creative serving suggestions to make your board festive and fun.
Spooky Garnishes
- Spider Web Dip: Use cream cheese and black olives to create a spider web design on a small bowl of dip.
- Pumpkin Cheese Ball: Mold cheese into a pumpkin shape and use green bell pepper for the stem.
Themed Utensils
- Halloween Toothpicks: Use toothpicks with spooky designs for easy serving of meats and cheeses.
- Mini Cauldron Bowls: Serve dips or spreads in mini cauldron-shaped bowls for a whimsical touch.
Creative Arrangements
- Layered Heights: Stack different cheeses and meats at varying heights for visual interest.
- Fruit Monsters: Arrange grapes and blackberries to resemble spooky creatures or monsters.
Festive Napkins and Plates
- Halloween-themed Tableware: Use plates, napkins, or serving trays that feature Halloween motifs to enhance the theme.
- Individual Serving Boards: Provide small wooden boards for guests to create their own mini boards.
How to Perfect Halloween Charcuterie board
Creating the perfect Halloween charcuterie board requires attention to detail. Follow these tips for an eye-catching display.
- Colors: Choose ingredients with rich colors like blackberries, dark cheeses, and orange-hued meats to create visual contrast.
- Variety of Textures: Include crunchy nuts, creamy cheeses, and soft fruits for an appealing texture combination.
- Seasonal Flavors: Incorporate seasonal flavors like pumpkin spice in spreads or dips for added festivity.
- Arrangement Matters: Place larger items first, then fill in gaps with smaller items for an organized look.
Best Side Dishes for Halloween Charcuterie board
Adding side dishes can elevate your Halloween charcuterie board experience. Here are some great options that pair well with it.
- Stuffed Mini Peppers: These colorful bites can be filled with cream cheese or spicy sausage for added flavor.
- Roasted Pumpkin Seeds: A crunchy snack that offers a nutty flavor, perfect for the fall season.
- Witch’s Brew Soup: A warm soup served in small cups adds warmth to your gathering; consider a green pea or butternut squash base.
- Savory Scones: Herb-infused scones can provide a delightful contrast to the richness of the charcuterie board.
- Cheese Stuffed Olives: These can be offered as an alternative garnish or side that complements the main selection of cheeses.
- Cranberry Chutney: A sweet-tart chutney that pairs beautifully with meats and cheeses on your board.
Common Mistakes to Avoid
Creating a Halloween charcuterie board can be fun, but there are common mistakes that can lead to disappointment. Here are some pitfalls to watch out for.
- Overcrowding the Board: Avoid cramming too many items into one space. Instead, leave some empty areas for a cleaner look and easier access.
- Ignoring Color Variety: Don’t stick to all dark colors. Include colorful fruits and spreads to make your Halloween charcuterie board visually appealing.
- Not Including Cheese Knives: Ensure you provide cheese knives for each cheese type. This prevents guests from struggling to serve themselves.
- Forgetting Dietary Preferences: Consider including vegetarian or gluten-free options. This way, everyone can enjoy your Halloween charcuterie board.
- Neglecting Seasonal Themes: Failing to incorporate Halloween-themed decorations or shapes can lessen the festive spirit. Use pumpkins, spooky picks, or themed plates.
Storage & Reheating Instructions
Refrigerator Storage
- Store leftovers in airtight containers to maintain freshness for up to 3 days.
- Keep cheeses separated from meats to preserve their flavors.
Freezing Halloween Charcuterie board
- It is best not to freeze a charcuterie board as it can affect the texture of cheeses and meats.
- If you must freeze, wrap individual components separately.
Reheating Halloween Charcuterie board
- Oven: Preheat to 350°F (175°C) and warm items for about 10-15 minutes.
- Microwave: Heat in short intervals (30 seconds) until warm; avoid overheating.
- Stovetop: Use a skillet on low heat for meats like prosciutto or chorizo, stirring gently until warmed.
Frequently Asked Questions
Here are some common questions about making a Halloween charcuterie board.
What should I include in my Halloween charcuterie board?
A great Halloween charcuterie board includes a variety of cheeses, cured meats, nuts, fruits, and themed decorations.
Can I prepare my Halloween charcuterie board in advance?
Yes! You can prep the ingredients a day before and assemble them just before serving to keep everything fresh.
How do I make my Halloween charcuterie board spooky?
Add decorative elements like mini pumpkins, ghost-shaped cheese slices, or spider-shaped crackers for a festive touch.
How long does a Halloween charcuterie board last?
A prepared Halloween charcuterie board can last up to 3 days in the refrigerator if stored properly.
Final Thoughts
This Halloween charcuterie board is perfect for any gathering. Its versatility allows you to customize it with your favorite cheeses and meats while adding seasonal touches. Try it at your next celebration for an easy yet impressive appetizer that will delight your guests!
Halloween Charcuterie Board
Indulge your guests this Halloween with a stunning charcuterie board that marries delicious flavors with a festive flair. This Halloween charcuterie board is not only visually captivating but also incredibly easy to assemble, making it the perfect centerpiece for any gathering—from spooky parties to cozy nights in. Featuring a delightful array of cheeses, cured meats, seasonal fruits, and playful treats, this board invites everyone to share and interact while enjoying their favorite snacks. With minimal effort and maximum impact, you can create an impressive display that embodies the spirit of Halloween.
- Prep Time: 15 minutes
- Cook Time: 0 minutes
- Total Time: 15 minutes
- Yield: Serves 8
- Category: Appetizer
- Method: No cooking
- Cuisine: American
Ingredients
- 300 g Gorgonzola cheese
- 200 g Cheddar cheese
- 200 g Aged Provolone cheese
- 100 g Goat's cheese
- 200 g Salami
- 200 g Chorizo
- 150 g Prosciutto
- 1 cup Almonds
- 2 cups Blackberries
- 2 bunches Black grapes
- ½ cup Tomato jam
- 1 cup Cornichons
- 1 cup Green olives
- Crackers
Instructions
- Prepare your serving board by placing small bowls for spreads and olives.
- Begin arranging by spacing the bowls evenly on the board.
- Add cheeses first; slice firmer varieties into wedges and batons for easy serving.
- Incorporate folded or rolled meats in between the cheese sections.
- Include sliced bread and stack crackers for easy access.
- Fill remaining spaces with fruit, nuts, pickles, and spreads.
Nutrition
- Serving Size: 1/8 of board (approximately 250g)
- Calories: 480
- Sugar: 8g
- Sodium: 1100mg
- Fat: 31g
- Saturated Fat: 14g
- Unsaturated Fat: 14g
- Trans Fat: 0g
- Carbohydrates: 32g
- Fiber: 5g
- Protein: 20g
- Cholesterol: 70mg