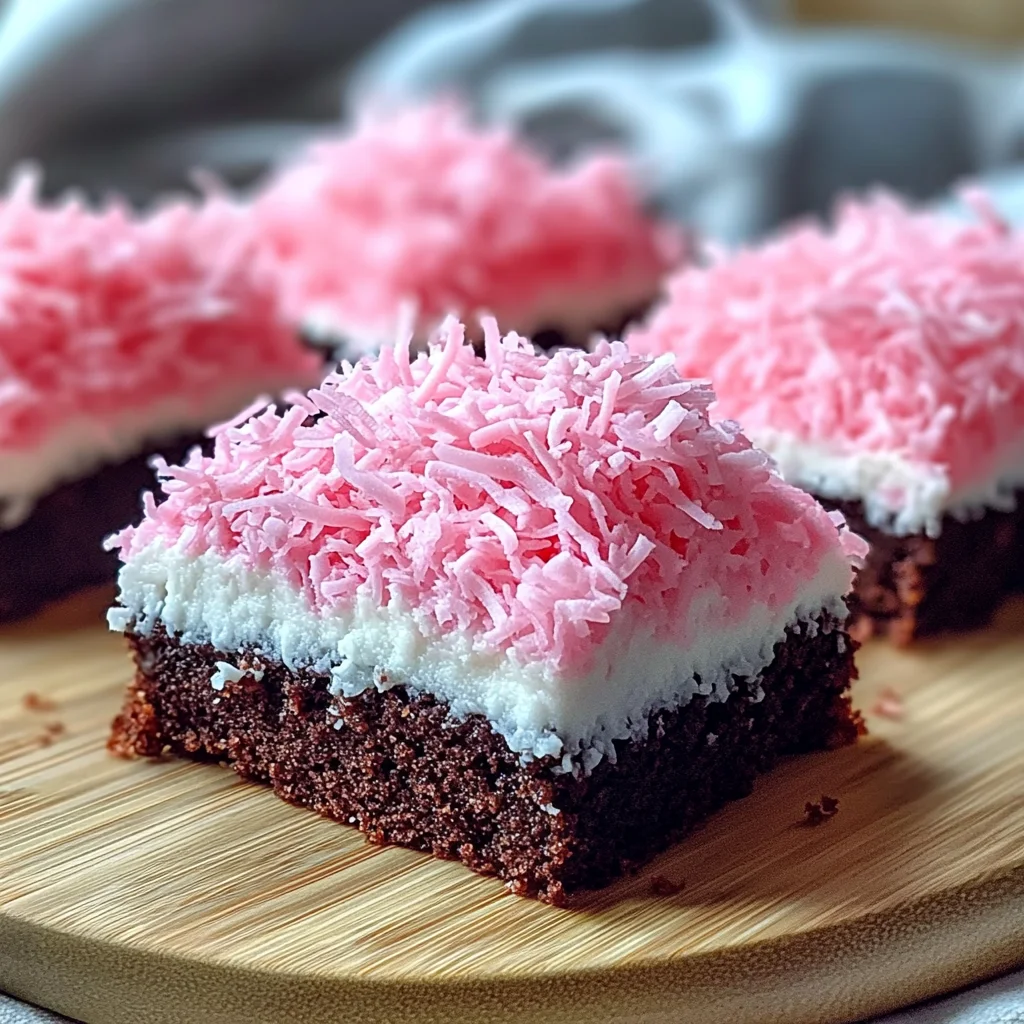
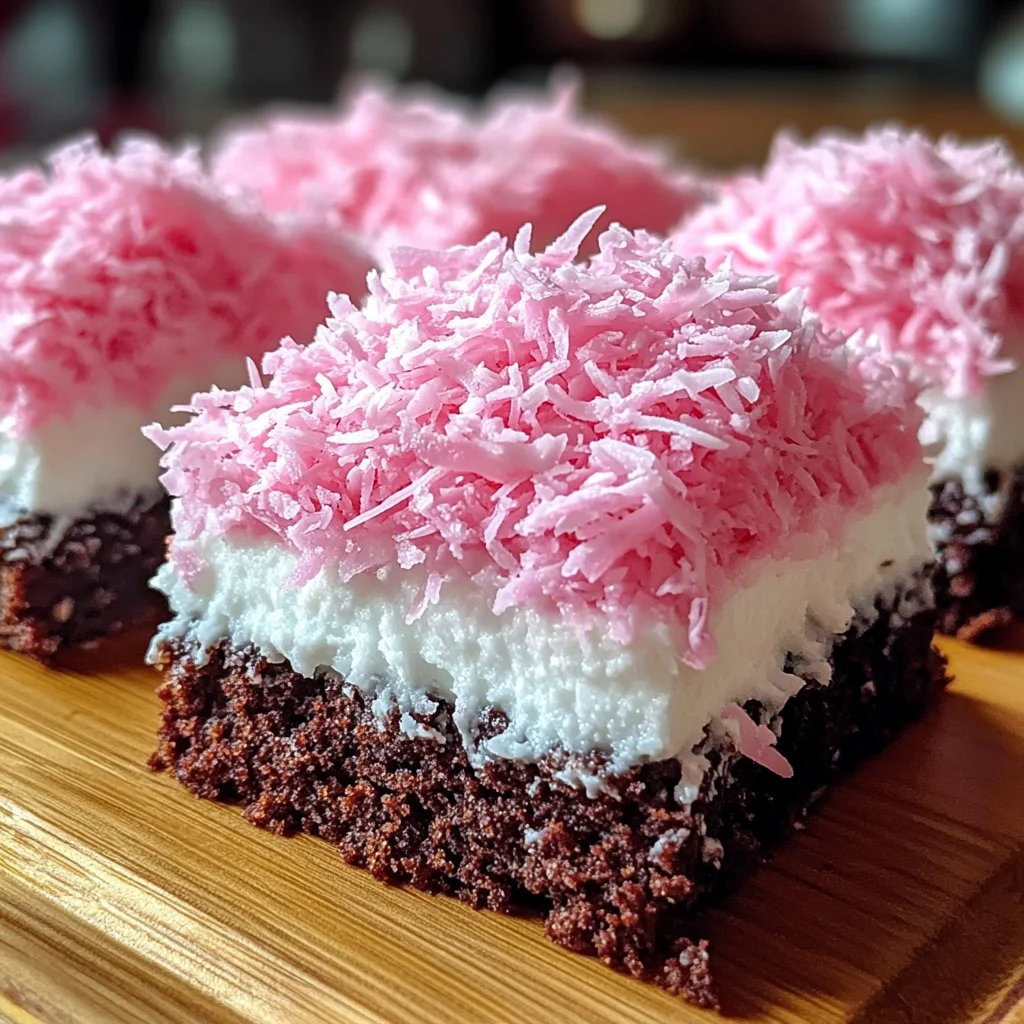
Pink Coconut Snowball Cake Bars
Delight in the scrumptiousness of Pink Coconut Snowball Cake Bars! These delightful dessert bars feature a rich chocolate base topped with vibrant pink coconut, making them perfect for any occasion. Whether you’re hosting a party or simply want to treat yourself, these cake bars will impress with their unique flavors and eye-catching appearance.
Why You’ll Love This Recipe
- Easy to Make: This recipe is straightforward, allowing even novice bakers to create something special.
- Rich Flavor: The combination of chocolate and coconut creates a deliciously indulgent treat that satisfies your sweet tooth.
- Versatile Dessert: Perfect for birthdays, holidays, or just because; these bars fit any occasion.
- Visually Stunning: The vibrant pink coconut topping adds a beautiful pop of color that makes these bars stand out.
- Chill & Serve: These bars are best served chilled, making them an excellent make-ahead dessert for gatherings.
Tools and Preparation
Gathering the right tools is essential for creating your Pink Coconut Snowball Cake Bars. Having everything ready before you start will make the process smooth and enjoyable.
Essential Tools and Equipment
- Mixing bowls
- Baking pan (9×13 inches)
- Whisk
- Electric mixer
- Rubber spatula
Importance of Each Tool
- Mixing bowls: These are crucial for combining ingredients without making a mess.
- Baking pan: A good-quality pan helps ensure even baking and easy removal of the finished product.
- Electric mixer: This tool speeds up the creaming process, ensuring a fluffy batter without much effort.
Ingredients
Delicious Pink Coconut Snowball Cake Bars with a rich chocolate base and a vibrant pink coconut topping, perfect for any occasion.
For the Cake Base
- 1 cup all-purpose flour
- ½ cup cocoa powder
- 1 tsp baking powder
- ½ tsp baking soda
- ½ tsp salt
- ½ cup unsalted butter (softened)
- 1 cup granulated sugar
- 2 large eggs
- 1 tsp vanilla extract
- ½ cup buttermilk
- ½ cup hot water
For the Topping
- 1 ½ cups heavy whipping cream
- ½ cup powdered sugar
- 1 tsp vanilla extract
- 8 oz cream cheese (softened, optional for stability)
- 2 cups shredded coconut (sweetened or unsweetened)
- 2–3 drops pink food coloring
- 1 tbsp milk (to moisten coconut if needed)
How to Make Pink Coconut Snowball Cake Bars
Step 1: Preheat the Oven
Preheat your oven to 175°C (350°F) to prepare it for baking the cake.
Step 2: Prepare the Baking Pan
Grease and line your 9×13-inch baking pan with parchment paper to prevent sticking.
Step 3: Combine Dry Ingredients
In a mixing bowl, whisk together:
1. Flour
2. Cocoa powder
3. Baking powder
4. Baking soda
5. Salt
Step 4: Cream Butter and Sugar
In another bowl, cream together the softened butter and granulated sugar until fluffy using an electric mixer.
Step 5: Add Eggs and Vanilla
Add in the eggs one at a time along with vanilla extract, beating well after each addition until fully combined.
Step 6: Mix in Dry Ingredients Alternately with Buttermilk
Gradually mix in your dry ingredients alternately with buttermilk until well incorporated.
Step 7: Incorporate Hot Water
Stir in hot water last; this ensures a smooth batter consistency.
Step 8: Bake the Cake
Pour the batter into your prepared pan and bake for 25–30 minutes. Check doneness by inserting a toothpick; it should come out clean when done. Allow it to cool completely.
Step 9: Prepare the Topping
If using cream cheese, beat it until smooth in a separate bowl. Then add heavy whipping cream, powdered sugar, and vanilla extract to it. Whip until fluffy and spreadable.
Step 10: Frost the Cake
Spread your creamy mixture evenly over the cooled chocolate cake base using a rubber spatula.
Step 11: Color Your Coconut
Place shredded coconut in a bowl. Add pink food coloring drops and mix until evenly tinted. If needed, add a splash of milk to help distribute color more effectively.
Step 12: Apply Coconut Topping
Sprinkle the colored coconut evenly over your frosted cake. Press lightly to ensure it sticks well.
Step 13: Chill Before Serving
Refrigerate for at least one hour before slicing into squares for serving. Enjoy chilled as a refreshing dessert!
How to Serve Pink Coconut Snowball Cake Bars
These Pink Coconut Snowball Cake Bars are a delightful treat that can be enjoyed in various ways. Whether you’re hosting a party or simply treating yourself, here are some creative serving suggestions.
Pair with Fresh Berries
- Strawberries: Fresh strawberries add a juicy, sweet contrast to the rich chocolate base.
- Raspberries: The tartness of raspberries complements the sweetness of the cake bars perfectly.
- Blueberries: Serve with blueberries for a pop of color and added nutrition.
Add a Scoop of Ice Cream
- Vanilla Ice Cream: Classic pairing that balances the chocolate and coconut flavors.
- Coconut Ice Cream: Enhance the coconut flavor profile for a tropical twist.
- Chocolate Ice Cream: For the true chocolate lovers, this combo is heavenly.
Drizzle with Chocolate Sauce
- Dark Chocolate Sauce: A rich drizzle enhances the chocolate flavor and adds an elegant touch.
- White Chocolate Sauce: For a sweet contrast, drizzle white chocolate sauce on top.
Garnish with Mint Leaves
- Fresh Mint: Add sprigs of fresh mint for a refreshing taste and beautiful presentation.
- Mint Flavored Whipped Cream: Use mint-infused whipped cream for an extra layer of flavor.
How to Perfect Pink Coconut Snowball Cake Bars
To achieve the best results with your Pink Coconut Snowball Cake Bars, consider these helpful tips.
- Use room temperature ingredients: Allow butter and eggs to reach room temperature for better mixing and texture.
- Sift dry ingredients: Sifting flour and cocoa powder removes lumps and ensures a light batter.
- Don’t skip cooling time: Allowing the cake to cool completely helps prevent melting your frosting.
- Adjust coconut color as desired: Feel free to add more pink food coloring for a deeper hue or less for subtlety.
- Store properly: Keep leftover bars covered in the fridge to maintain freshness.
Best Side Dishes for Pink Coconut Snowball Cake Bars
Serving Pink Coconut Snowball Cake Bars alongside complementary dishes can enhance your dessert experience. Here are some great side dish ideas.
- Fruit Salad: A mix of seasonal fruits offers freshness that balances the sweetness of the bars.
- Whipped Cream: Light and airy whipped cream adds richness while keeping it light in flavor.
- Chocolate Mousse: A decadent chocolate mousse pairs beautifully with the cake bars’ textures.
- Coconut Rice Pudding: Creamy rice pudding infused with coconut echoes the flavors in your cake bars.
- Coffee or Tea: A warm beverage like coffee or herbal tea provides a comforting contrast to dessert.
- Cheese Platter: A selection of mild cheeses can introduce savory notes that complement sweet desserts.
Common Mistakes to Avoid
When making Pink Coconut Snowball Cake Bars, avoid these common pitfalls to ensure your dessert turns out perfectly.
- Skipping the Cooling Step: Allowing the cake to cool completely is essential. Skipping this can lead to a soggy base when you add the frosting.
- Not Measuring Ingredients Accurately: Precision is key in baking. Use measuring cups and spoons for accurate ingredient amounts to avoid altering the texture.
- Using Cold Ingredients: Bring eggs and butter to room temperature before mixing. This helps create a smooth batter and better texture.
- Overmixing the Batter: Mix just until combined to avoid tough cake bars. Overmixing develops the gluten in flour too much.
- Ignoring Frosting Consistency: Ensure your frosting is fluffy enough to spread easily but not too runny. Adjust with powdered sugar or cream if necessary.
Storage & Reheating Instructions
Refrigerator Storage
- Store in an airtight container for up to 5 days.
- Keep separated with parchment paper if stacking.
Freezing Pink Coconut Snowball Cake Bars
- Wrap bars tightly in plastic wrap and then in aluminum foil for up to 3 months.
- Thaw in the refrigerator overnight before serving.
Reheating Pink Coconut Snowball Cake Bars
- Oven: Preheat oven to 175°C (350°F). Heat bars for about 10 minutes until warmed through.
- Microwave: Heat individual bars on medium power for 15-20 seconds until warm.
- Stovetop: Place bars in a skillet over low heat, covering with a lid for a few minutes until warmed.
Frequently Asked Questions
Here are some common questions about making Pink Coconut Snowball Cake Bars.
Can I make Pink Coconut Snowball Cake Bars without cream cheese?
Yes, you can omit cream cheese entirely. The whipped cream will still provide a delicious topping.
How do I customize my Pink Coconut Snowball Cake Bars?
You can add nuts or different flavored extracts like almond or coconut for extra flair.
What should I do if my frosting is too runny?
If your frosting is too runny, gradually add more powdered sugar until it reaches your desired consistency.
Can I use unsweetened coconut instead of sweetened?
Yes, using unsweetened coconut will give a more subtle flavor. Just adjust sugar levels accordingly in the recipe if desired.
Final Thoughts
These Pink Coconut Snowball Cake Bars are not only visually stunning but also delightfully tasty. They are versatile enough for various occasions, from parties to casual gatherings. Feel free to customize them by adding flavors or toppings that you love. Try them out today!
Pink Coconut Snowball Cake Bars

Indulge in the delightful Pink Coconut Snowball Cake Bars, a treat that combines a rich chocolate base with a visually stunning pink coconut topping. Perfect for any occasion, these bars are easy to make and serve as an impressive dessert for parties or a sweet indulgence for yourself. The combination of flavors from chocolate and coconut creates a satisfying experience that will delight your palate. These cake bars can also be made ahead of time, making them an ideal choice for gatherings where you want to wow your guests. With their vibrant appearance and delicious flavor, Pink Coconut Snowball Cake Bars are sure to become a favorite.
- Prep Time: 20 minutes
- Cook Time: 30 minutes
- Total Time: 50 minutes
- Yield: Approximately 12 servings 1x
- Category: Dessert
- Method: Baking
- Cuisine: American
Ingredients
- 1 cup all-purpose flour
- ½ cup cocoa powder
- ½ tsp baking powder
- ½ tsp baking soda
- ½ tsp salt
- ½ cup unsalted butter (softened)
- 1 cup granulated sugar
- 2 large eggs
- 1 tsp vanilla extract
- ½ cup buttermilk
- ½ cup hot water
- 1 ½ cups heavy whipping cream
- ½ cup powdered sugar
- 1 tsp vanilla extract
- 2 cups shredded coconut
- 2–3 drops pink food coloring
- 1 tbsp milk (to moisten coconut if needed)
Instructions
- Preheat oven to 350°F (175°C). Grease and line a 9×13-inch baking pan with parchment paper.
- In a mixing bowl, whisk together flour, cocoa powder, baking powder, baking soda, and salt.
- Cream softened butter and sugar in another bowl until fluffy. Add eggs one at a time along with vanilla extract.
- Gradually mix in dry ingredients alternately with buttermilk until well combined. Stir in hot water last for smooth batter.
- Pour batter into prepared pan and bake for 25–30 minutes until a toothpick comes out clean.
- Allow the cake to cool completely before frosting with whipped cream mixed with powdered sugar and vanilla extract.
- Color shredded coconut with pink food coloring and sprinkle it over the frosted cake before chilling for at least one hour.
- Slice into squares and enjoy!
Nutrition
- Serving Size: 1 square (45g)
- Calories: 190
- Sugar: 15g
- Sodium: 75mg
- Fat: 10g
- Saturated Fat: 6g
- Unsaturated Fat: 3g
- Trans Fat: 0g
- Carbohydrates: 24g
- Fiber: 1g
- Protein: 2g
- Cholesterol: 40mg